mini zombie cookies
If you’re looking for a fun and spooky treat this Halloween, you’ve landed in the right place! These mini zombie cookies are not just adorable; they’re also incredibly easy to make. Every bite is a delicious reminder of the joy of baking with family and friends. Whether you’re hosting a Halloween party or just want to surprise your little ones after school, these cookies will be a hit!
What makes this recipe special? It’s all about the creativity involved! You can let your imagination run wild as you decorate each cookie like a little zombie masterpiece. Plus, they’re perfect for sharing or even giving as gifts during the spooky season.
Why You’ll Love This Recipe
- So much fun: Decorating mini zombie cookies is an activity everyone will enjoy, from kids to adults.
- Easy preparation: With simple ingredients and straightforward steps, you won’t need to be a baking expert.
- Perfect for gatherings: These cookies will surely impress at Halloween parties, school events, or even cozy family nights.
- Creative freedom: You can personalize each cookie however you like—make them cute or creepy!
- Make ahead: Prepare the cookie dough in advance and bake whenever you’re ready, making it super convenient.
Ingredients You’ll Need
Let’s gather some simple, wholesome ingredients that come together to create these delightful mini zombie cookies! You’ll find everything you need right in your kitchen or at your local store.
For the Cookies
- cookie dough
- royal icing
- circle cookie cutter (2-inches)
For Decorating
- food coloring (Electric Green, Electric Pink, Red Red and Super Black)
- jumbo candy eyes
- red food coloring pen (optional if using these Halloween candy eyes)
- disposable decorating bags
- couplers
- decorating tips (sizes 2, 3, and 4)
Variations
This recipe is versatile and can be adapted to suit different tastes and preferences. Here are a few fun ideas!
- Change up the colors: Use different food colorings to create unique zombie themes—think blue zombies or purple monsters!
- Switch the toppings: Instead of candy eyes, try small chocolate chips or sprinkles for a different look.
- Add flavors: Mix in some extracts like almond or vanilla to your cookie dough for an added twist.
- Make them gluten-free: Substitute regular flour with gluten-free flour blends for a tasty alternative!
How to Make mini zombie cookies
Step 1: Prepare the Cookie Dough
Start by preparing your cookie dough according to your favorite recipe. Roll it out to about 1/4-inch thick. This thickness helps achieve that perfect chewy texture while ensuring they hold their shape during baking.
Step 2: Cut Out Your Cookies
Using your circle cookie cutter, cut out circles from the rolled-out dough. Place them on a baking sheet and bake as directed. Let them cool completely before decorating—this step is crucial to prevent the icing from melting!
Step 3: Prepare the Royal Icing
While your cookies cool down, prepare your royal icing. Divide it into small bowls based on how many colors you want to use. Working with smaller amounts makes it easier to manage while decorating.
Step 4: Tint Your Icing
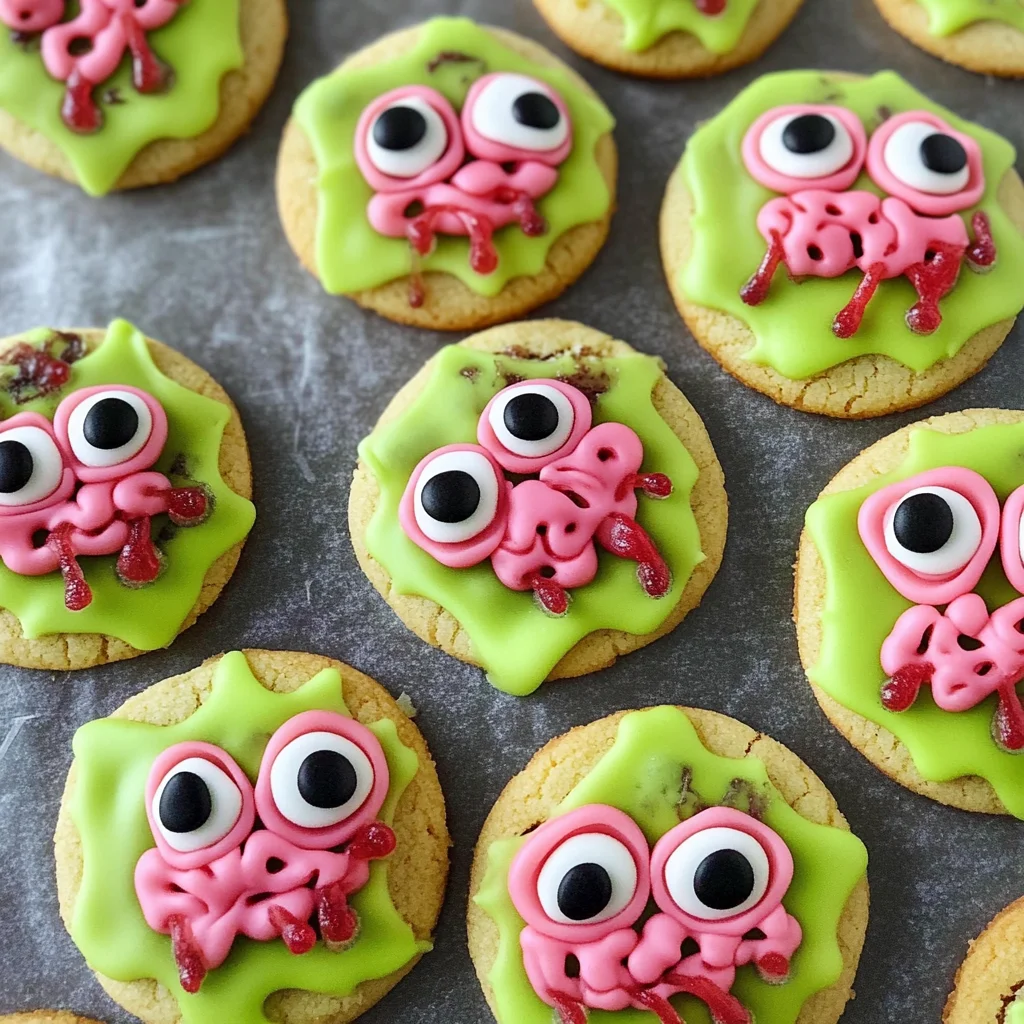
Now comes the fun part! Tint some icing light pink for brains and green for skin. Don’t forget to adjust consistency: keep some icing thick for outlining and thin some down with water for filling.
Step 5: Decorate Your Zombie Cookies
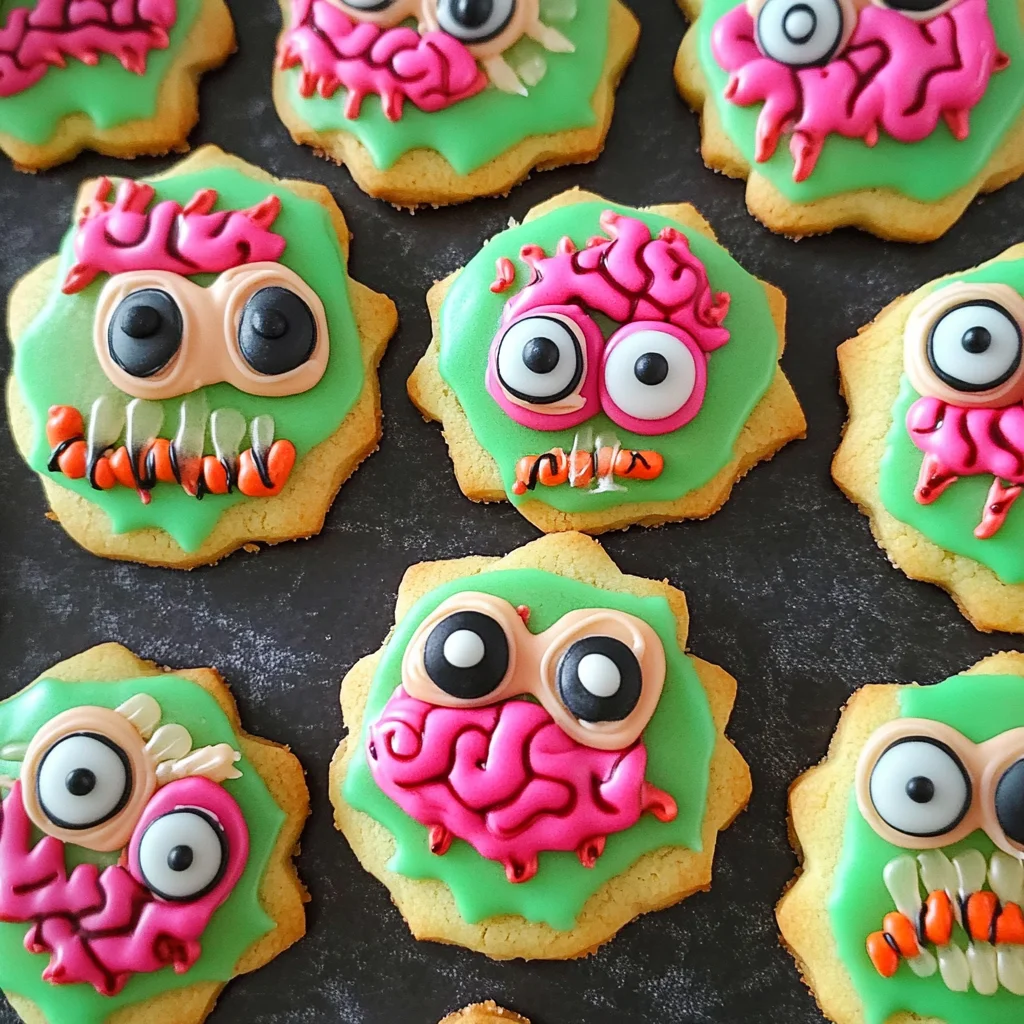
Outline each cookie with green icing but leave the top open. After letting it set briefly, pipe pink icing at the top for brains. Then fill in the rest of the cookie with green icing. Press a candy eye into each one and add black X eyes and squiggly mouths using black icing before finishing with splashes of red icing for that classic spooky effect!
Enjoy these mini zombie cookies with friends and family this Halloween—they’re sure to become a cherished tradition!
Pro Tips for Making mini zombie cookies
Making mini zombie cookies can be a fun and rewarding experience, especially when you have a few tips up your sleeve!
-
Use Room Temperature Icing – Keeping your royal icing at room temperature helps it flow better when decorating, ensuring smooth and even coverage on your cookies.
-
Practice Piping Techniques – Before decorating the actual cookies, practice piping on parchment paper. This will help you get comfortable with the pressure needed for different designs and improve your precision.
-
Let Each Layer Dry – Allow each layer of icing to set before adding the next. This prevents colors from bleeding into one another and keeps your designs looking sharp and clean.
-
Experiment with Colors – Don’t hesitate to mix your food coloring for unique shades! Custom colors can make your mini zombie cookies stand out even more.
-
Store Properly – Once decorated, store your cookies in an airtight container. This keeps them fresh longer and preserves the integrity of your designs.
How to Serve mini zombie cookies
Serving mini zombie cookies can be just as creative as making them! These spooky treats are perfect for Halloween gatherings, parties, or simply as a festive treat to share with family and friends.
Garnishes
- Edible Glitter – Sprinkle some edible glitter on top of the icing for an extra sparkle that catches the eye.
- Halloween Sprinkles – Use themed sprinkles like bats or ghosts to add a playful touch that enhances the Halloween spirit.
Side Dishes
- Pumpkin Spice Cupcakes – Moist cupcakes infused with pumpkin spice flavor that complement the sweetness of the cookies while adding a seasonal touch.
- Apple Slices with Caramel Dip – Crisp apple slices paired with creamy caramel provide a refreshing contrast to the rich sweetness of the cookies.
- Ghostly Fruit Salad – A mix of spooky-shaped fruit pieces (think ghostly bananas and orange pumpkins) adds color and healthiness to your dessert table.
- Cheesy Snacks Platter – A variety of cheeses paired with crackers offers savory options that balance out the sweetness of mini zombie cookies beautifully.
Make Ahead and Storage
These mini zombie cookies are not just a fun treat for Halloween; they also make for an excellent meal prep option! You can prepare the cookie dough and icing in advance, making it easy to whip up a spooky batch whenever the mood strikes.
Storing Leftovers
- Keep any uneaten cookies in an airtight container at room temperature for up to 5 days.
- If you want to maintain their freshness, store them in the refrigerator for up to a week.
- For best results, avoid stacking the cookies directly on top of each other; use parchment paper between layers to prevent sticking.
Freezing
- Allow the cookies to cool completely before freezing.
- Place the cookies in a single layer on a baking sheet and freeze until solid.
- Transfer them to a freezer-safe bag or container, separating layers with parchment paper, and store for up to 3 months.
- If you’ve decorated the cookies, it’s best to freeze them before adding icing.
Reheating
- To thaw frozen cookies, simply leave them at room temperature for about 30 minutes.
- If you prefer warm cookies, you can pop them in the microwave for 10-15 seconds.
- Avoid reheating decorated cookies in the microwave as it may cause the icing to melt.
FAQs
Here are some frequently asked questions about these delightful mini zombie cookies!
Can I make mini zombie cookies gluten-free?
Absolutely! You can substitute regular flour with a gluten-free blend that is suitable for baking. Just ensure all other ingredients are gluten-free as well.
What is the best way to decorate mini zombie cookies?
The best way is by using royal icing as described in the recipe. It holds its shape beautifully, allowing you to create fun designs like brains and candy eyes!
How long do mini zombie cookies last after baking?
Mini zombie cookies can last up to 5 days at room temperature when stored properly. You can also refrigerate or freeze them for longer storage.
Can I use different colors for decorating mini zombie cookies?
Yes! Feel free to get creative with food coloring. Just remember that using vibrant colors will make your zombie cookies even more fun and eye-catching!
Final Thoughts
I hope you find joy in creating these mini zombie cookies! They’re not only a delightful treat but also a fantastic way to get into the Halloween spirit. Whether you’re sharing them with friends or enjoying a spooky night at home, I’m sure they’ll bring smiles all around. Happy baking, and enjoy every bite of your deliciously eerie creations!
Mini Zombie Cookies
Get ready to bake up some spooky fun with these mini zombie cookies! Perfect for Halloween festivities, these adorable treats are not only easy to make but also invite creativity in decorating. With a chewy texture and vibrant colors, they’re bound to impress both kids and adults alike. Whether you’re hosting a Halloween party or surprising your little ones after school, these cookies are a delightful way to celebrate the season. Plus, the decorating process offers a fantastic opportunity for family bonding. Let your imagination run wild as you transform simple cookies into colorful zombie masterpieces that everyone will love!
- Prep Time: 20 minutes
- Cook Time: 10 minutes
- Total Time: 30 minutes
- Yield: Approximately 24 cookies
- Category: Dessert
- Method: Baking
- Cuisine: American
Ingredients
- cookie dough
- royal icing
- food coloring (Electric Green, Electric Pink, Red Red, Super Black)
- jumbo candy eyes
- red food coloring pen (optional if using these Halloween candy eyes)
- disposable decorating bags
- couplers
- decorating tips (sizes 2, 3, and 4)
Instructions
- Prepare cookie dough per your favorite recipe and roll it out to 1/4-inch thick.
- Cut out circles using a 2-inch cookie cutter and place them on a baking sheet to bake as directed. Allow cooling completely before decorating.
- Prepare royal icing by dividing it into small bowls for your desired colors.
- Tint the icing—use pink for brains and green for skin—adjusting consistency as needed.
- Decorate by outlining each cookie in green icing and filling in with pink and green details, adding candy eyes and squiggly designs.
Nutrition
- Serving Size: 1 cookie (30g)
- Calories: 150
- Sugar: 10g
- Sodium: 50mg
- Fat: 6g
- Saturated Fat: 2g
- Unsaturated Fat: 4g
- Trans Fat: 0g
- Carbohydrates: 22g
- Fiber: 1g
- Protein: 2g
- Cholesterol: 0mg


