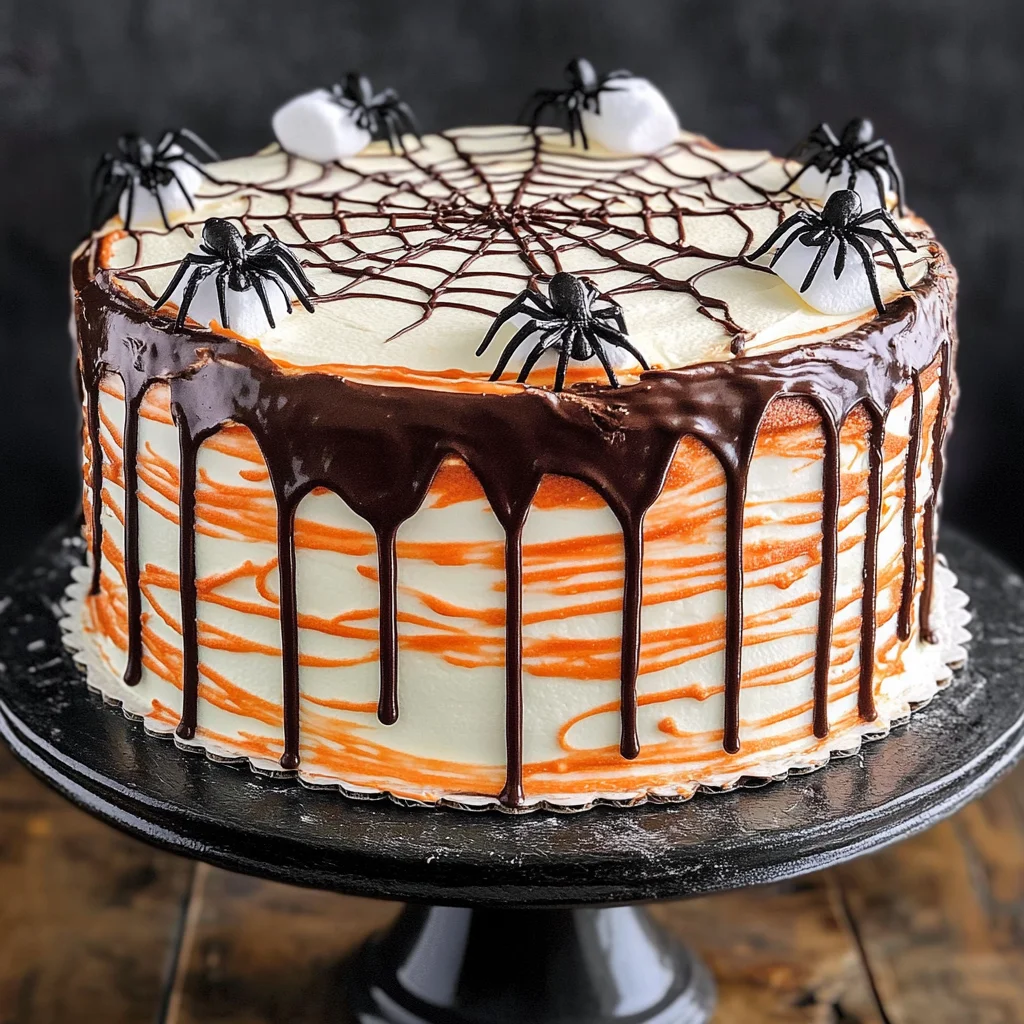
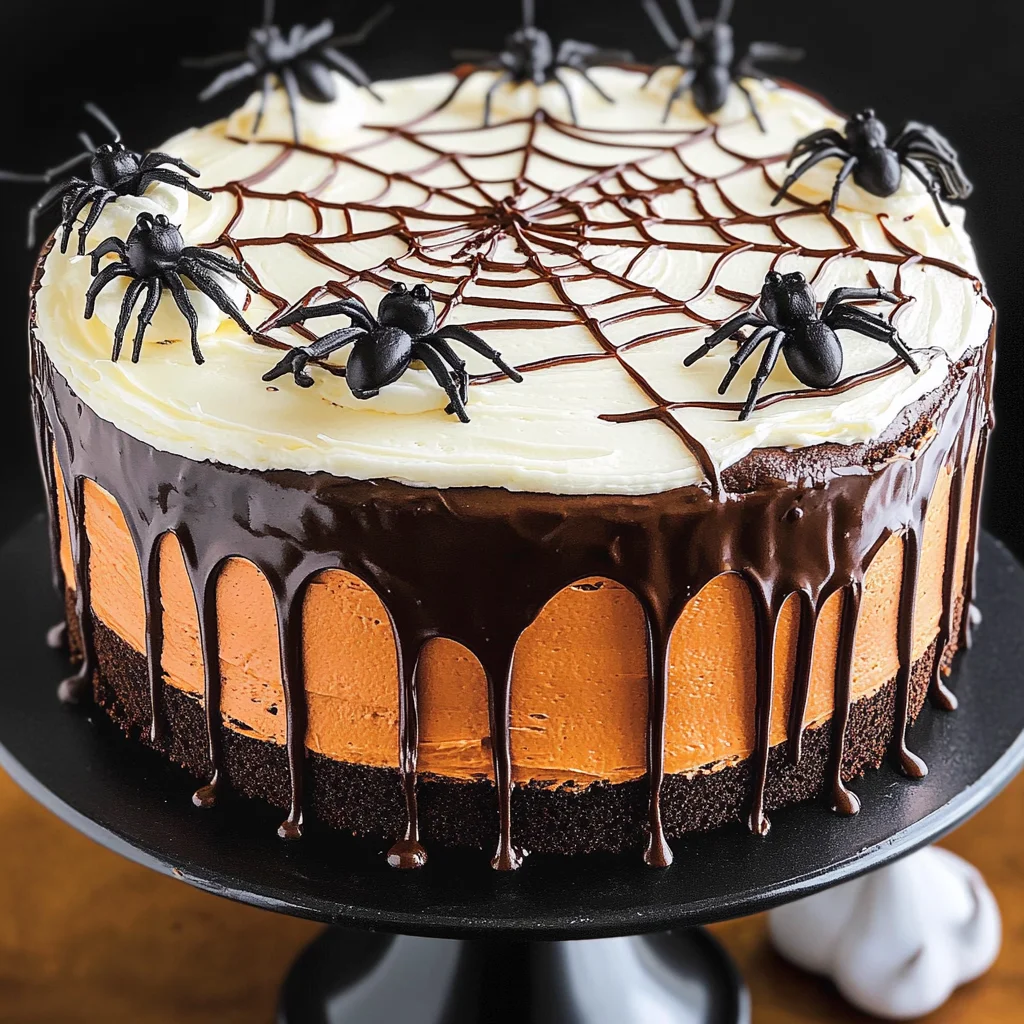
Spiderweb Cake
If you’re looking for a show-stopping dessert that’s perfect for Halloween or any celebration, this Spiderweb Cake is just what you need! With its rich chocolate layers and creamy frosting, this cake is both delicious and eye-catching. The eerie web of vegan marshmallows adds a spooky twist that will delight guests of all ages. Whether you’re hosting a family gathering or simply want to impress at a potluck, this cake makes the occasion extra special.
What I love most about this Spiderweb Cake is how surprisingly simple it is to whip up. You don’t need to be a master baker to create something so impressive. Plus, it works wonderfully with various flours, making it adaptable for everyone in your life—gluten-free friends included!
Why You’ll Love This Recipe
- Easy to Make: This recipe comes together quickly, making it a great choice for busy bakers.
- Family-Friendly Appeal: Kids will adore the spooky design, and they can even help with decorating!
- Make-Ahead Convenience: You can bake the cake layers in advance and frost them just before serving.
- Delicious Flavor: Rich chocolate paired with creamy frosting creates an irresistible treat.
- Versatile Ingredients: Use all-purpose, whole wheat, or gluten-free flour based on your preference!
Ingredients You’ll Need
Gathering the ingredients for this Spiderweb Cake is simple and fun. You’ll find that they are all wholesome staples that come together beautifully. Here’s what you’ll need:
For the Cake
- 3 cups granulated sugar
- 2 1/2 cups + 2 tablespoons flour (see notes)
- 3/4 cup + 2 tbsp Dutch-process cocoa powder
- 1/4 cup black cocoa powder (or more Dutch-process cocoa)
- 1 1/2 teaspoons baking powder
- 1 1/2 teaspoons baking soda
- 1 1/2 teaspoons salt
- 3 large eggs (each 50 grams out of shell, room temp, or use chia eggs – see notes)
- 1 1/2 cups milk (see notes)
- 3/4 cup olive oil (or canola/vegetable oil)
- 1 tablespoon vanilla extract
- 1 cup + 2 tablespoons boiling water
For the Frosting
- 24 ounces full-fat cream cheese (room temperature, see notes)
- 1 cup + 2 tablespoons unsalted butter
- 3 3/4 cups powdered sugar (or more if you like)
- 1 1/2 teaspoons vanilla extract
- pinch of salt
- orange gel food coloring (see notes)
For the Decoration
- 2 cups mini vegan marshmallows (see notes)
- plastic spiders
Variations
This recipe is wonderfully flexible! Here are some fun variations to make it your own:
- Gluten-Free Option: Swap regular flour for a gluten-free blend to accommodate dietary needs.
- Different Flavors: Experiment with flavored extracts like almond or peppermint for a unique twist!
- Healthier Frosting: Try using Greek yogurt mixed with a bit of powdered sugar for a lighter frosting option.
- Add Nuts: Sprinkle some chopped walnuts or pecans between the layers for added texture and flavor.
How to Make Spiderweb Cake
Step 1: Prepare Your Baking Pans
Start by preheating your oven to 350°F (175°C). Grease and flour two round cake pans. This step ensures your cakes come out easily without sticking.
Step 2: Combine Dry Ingredients
In a large mixing bowl, whisk together the granulated sugar, flour, both cocoa powders, baking powder, baking soda, and salt. Mixing these dry ingredients well helps ensure an even distribution of flavors throughout your cake.
Step 3: Mix Wet Ingredients
In another bowl, beat together the eggs (or chia eggs), milk, olive oil, and vanilla extract until smooth. Slowly add this mixture into the dry ingredients while stirring gently. This combination creates a rich batter that’s full of flavor.
Step 4: Add Boiling Water
Carefully stir in the boiling water until fully combined. This step may seem unusual but adding boiling water helps create moist cake layers that everyone will love!
Step 5: Bake the Cakes
Pour equal amounts of batter into each prepared pan. Bake in your preheated oven for about 24 minutes or until a toothpick inserted into the center comes out clean. Allow cakes to cool completely before frosting.
Step 6: Make the Frosting
While your cakes cool, prepare the frosting by beating together the cream cheese and butter until smooth. Gradually add powdered sugar and continue mixing until fluffy. Add vanilla extract and pinch of salt for extra flavor.
Step 7: Assemble Your Cake
Once cooled, place one layer on a serving plate. Spread frosting generously on top before adding the second layer. Frost around the sides too—make it as neat or messy as you’d like!
Step 8: Create Your Spiderweb
Using orange gel food coloring mixed with some frosting in a piping bag or zip-top bag with a small hole cut in one corner, pipe concentric circles on top of your frosted cake. Then use a toothpick or skewer to drag from the center outward to create web-like shapes.
Step 9: Decorate!
Finally, scatter mini vegan marshmallows across the top and add plastic spiders for that spooky touch! Serve slices at your gathering and watch everyone marvel at this deliciously eerie treat.
Enjoy making this delightful Spiderweb Cake—it’s sure to become a favorite in no time!
Pro Tips for Making Spiderweb Cake
Making a Spiderweb Cake can be a delightful experience, and with these tips, you’re sure to impress everyone at your gathering!
-
Use room temperature ingredients: Bringing eggs and cream cheese to room temperature helps create a smoother batter and frosting. This ensures better incorporation of ingredients, leading to a lighter cake texture.
-
Sift your dry ingredients: Sifting flour and cocoa powder can help eliminate lumps and aerate the mixture, resulting in a fluffier cake. Plus, it allows for even distribution of baking powder and soda, enhancing leavening.
-
Don’t skip the boiling water: Adding boiling water to the batter may seem unconventional, but it activates the cocoa powder, intensifying the chocolate flavor and keeping the cake moist.
-
Adjust sweetness in frosting: Taste as you go! If you prefer a less sweet frosting, feel free to reduce the powdered sugar gradually until you achieve your desired sweetness level.
-
Chill before decorating: Letting the layers cool completely before frosting them helps prevent melting. A chilled cake is easier to work with when creating that stunning spiderweb effect!
How to Serve Spiderweb Cake
Presenting your Spiderweb Cake is just as fun as making it! Here are some ideas for serving this spooky treat.
Garnishes
- Edible glitter: A sprinkle of edible glitter can add an enchanting touch that catches the light beautifully.
- Chocolate shavings: For an extra chocolatey flair, top your cake with chocolate shavings that contrast nicely against the creamy white frosting.
Side Dishes
- Pumpkin spice cupcakes: These mini delights bring seasonal flavors that complement the rich chocolate of the cake perfectly.
- Apple cider: A refreshing drink option that balances out the sweetness of the cake while adding a fall twist.
- Roasted pecans: Their crunchy texture provides a nice contrast to the soft layers of cake and creamy frosting.
- Spooky fruit platter: Create a colorful platter with oranges, blackberries, and grapes arranged in Halloween shapes for a festive touch.
With these presentation ideas and side dish recommendations, your Spiderweb Cake will not only taste fantastic but also look spooktacular on any dessert table! Enjoy every delicious bite!
Make Ahead and Storage
This Spiderweb Cake is not only a showstopper but also perfect for meal prep. You can make it ahead of time, allowing the flavors to meld beautifully while saving you time on the big day.
Storing Leftovers
- Keep any leftover cake in an airtight container at room temperature for up to 3 days.
- For longer storage, refrigerate the cake, where it will last for about a week.
- Ensure to cover the top with plastic wrap or store in a container to maintain freshness.
Freezing
- Slice the cake into individual portions before freezing for easier thawing.
- Wrap each slice tightly in plastic wrap, then place it in a freezer-safe bag or container.
- The cake can be frozen for up to 3 months. Just remember to label it!
Reheating
- To enjoy your frozen slices, remove them from the freezer and let them thaw in the refrigerator overnight.
- If you prefer warm cake, you can microwave individual slices for about 10-15 seconds until warmed through.
- For best results, allow it to come to room temperature before serving.
FAQs
Here are some common questions readers might have about making and enjoying Spiderweb Cake.
Can I make Spiderweb Cake gluten-free?
Absolutely! Simply substitute all-purpose flour with your favorite gluten-free flour blend. This recipe adapts well without sacrificing flavor or texture!
How do I create the spiderweb design on my cake?
To achieve that spooky spiderweb look, use melted vegan marshmallows drizzled artfully over the top of your frosted cake. It’s easier than you think and adds a fun touch!
What can I use instead of eggs in Spiderweb Cake?
You can use chia eggs as a great egg alternative. Mix 1 tablespoon of chia seeds with 2.5 tablespoons of water; let it sit for about 10 minutes until it thickens!
How long does Spiderweb Cake last?
If stored properly, this delightful cake can last up to a week in the refrigerator. It’s also perfect for freezing if you want to save some for later!
Final Thoughts
I hope this Spiderweb Cake brings joy and spookiness to your next gathering! With its rich chocolate layers and creamy frosting, it’s sure to impress friends and family alike. Enjoy making this delightful dessert, and don’t hesitate to get creative with your decorations! Happy baking!
Spiderweb Cake

Create an eye-catching Spiderweb Cake that’s easy to make! Perfect for gatherings or Halloween celebrations—try it today!
- Prep Time: 25 minutes
- Cook Time: 24 minutes
- Total Time: 49 minutes
- Yield: Approximately 16 servings 1x
- Category: Dessert
- Method: Baking
- Cuisine: American
Ingredients
- 3 cups granulated sugar
- 2 1/2 cups + 2 tablespoons flour (gluten-free option available)
- 3/4 cup + 2 tablespoons Dutch-process cocoa powder
- 1/4 cup black cocoa powder (or more Dutch-process cocoa)
- 1 1/2 teaspoons baking powder
- 1 1/2 teaspoons baking soda
- 1 1/2 teaspoons salt
- 3 large eggs or chia eggs
- 1 1/2 cups milk (dairy or plant-based)
- 3/4 cup olive oil (or canola/vegetable oil)
- 1 tablespoon vanilla extract
- 1 cup + 2 tablespoons boiling water
- 24 ounces full-fat cream cheese (room temperature)
- 1 cup + 2 tablespoons unsalted butter
- 3 3/4 cups powdered sugar
- 1 1/2 teaspoons vanilla extract
- pinch of salt
- orange gel food coloring (optional)
- 2 cups mini vegan marshmallows
- plastic spiders for decoration
Instructions
- Preheat oven to 350°F (175°C) and grease two round cake pans.
- Whisk together sugar, flour, both cocoa powders, baking powder, baking soda, and salt in a large bowl.
- In another bowl, mix eggs (or chia eggs), milk, olive oil, and vanilla until smooth; combine with dry ingredients.
- Stir in boiling water until mixed well.
- Pour batter into prepared pans; bake for about 24 minutes until a toothpick comes out clean. Cool completely.
- Beat cream cheese and butter together; gradually add powdered sugar until fluffy. Mix in vanilla and salt.
- Frost cooled cake layers and create a spiderweb design using colored frosting.
- Decorate with mini vegan marshmallows and plastic spiders.
Nutrition
- Serving Size: 1 slice (85g)
- Calories: 400
- Sugar: 38g
- Sodium: 250mg
- Fat: 18g
- Saturated Fat: 8g
- Unsaturated Fat: 9g
- Trans Fat: 0g
- Carbohydrates: 54g
- Fiber: 2g
- Protein: 4g
- Cholesterol: 30mg